Materials Used:
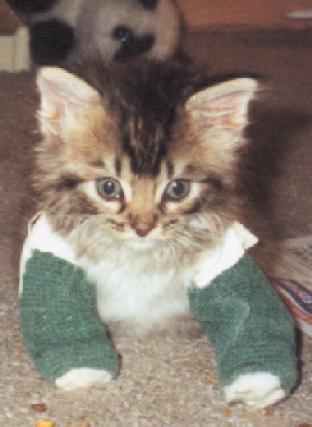
Soft guaze bandage (on a roll) Instructions Cut two thin strips of tape for each leg. These were used for the "stirrups" Put one strip on either side of the leg, starting midway up the leg. There should be about 1/2 inch extra past the toes. Wrap the vet wrap around the guaze. This will compress the guaze and give the brace some strength. DO NOT STRETCH THE VET WRAP WHILE WRAPPING! Otherwise the compression will be too tight and the foot will loose circulation! Cut a piece of tape long enough to go from the middle of one brace, over the shoulders, and to the top of the middle of the other brace. Cut another piece, slightly shorter. This is me after my braces were removed for the last time. If you look closely you can see the different parts. The long white strip in the middle is my shoulder strap. The curled white guaze pieces are my leg wraps. The blue is the vet wrap that goes over the guaze. We don't have a picture that shows the tape stirrups. Hope this helps! Mom is thinking about drawing and scanning a diagram.
vet wrap
first aid tape
You will also need scissors (bandage scissors preferrable).
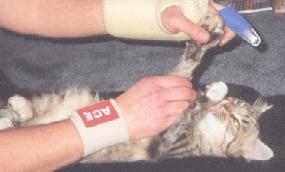
Wrap the soft guaze around the leg/wrist so that it keeps the leg in the desired position (straight!). Have the guaze extend past the toes (at least until the wrist gains some strength).
Put a little piece of first aid tape along the top.
Take the extra "stirrup" tape and fold it back over the guaze. This helps keep the guaze from slipping down!
Put the shorter piece STICKY SIDE TO STICKY SIDE with the longer piece. You now have a long strip with two exposed sticky ends. Attach those ends one to each brace. Secure them by putting another piece of tape around the brace, covering those ends.
This also helps keep the braces from sliding. Be sure to leave enough extra slack to allow for your animal to move!